Easy and budget-friendly woodworking ideas for creating personalized wood crafts and home accents.

Showing posts with label Income. Show all posts

DIY Wooden Candle Holders to Complement Your Rustic or Farmhouse Decor

DIY Wooden Candle Holders to Complement Your Rustic or Farmhouse Decor

DIY Wooden Candle Holders to Complement Your Rustic or Farmhouse Decor

Rustic and farmhouse decor have become increasingly popular in recent years, with their warm, inviting, and natural aesthetic. A key element of this style is the use of wood, and incorporating wooden candle holders is a great way to add a touch of rustic charm to your home. Not only are they visually appealing, but they also offer a cozy and welcoming ambiance. This article will guide you through the creation of several DIY wooden candle holders, each with unique designs to complement your rustic or farmhouse decor.

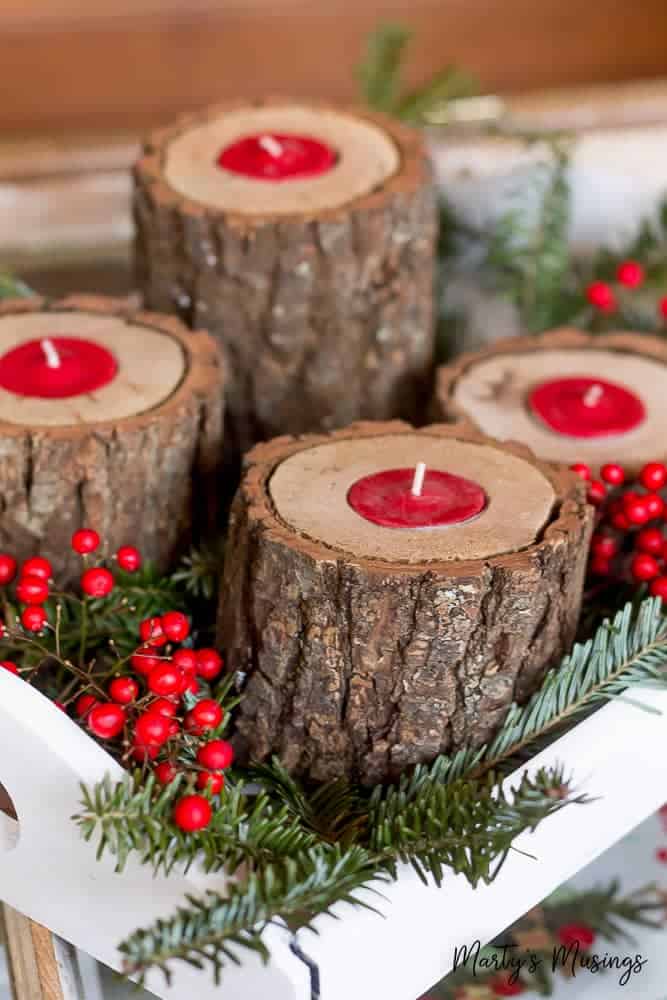
Simple and Elegant: The Rustic Log Candle Holder

This project utilizes the natural beauty of wood to create a simple yet elegant candle holder.

Materials Needed:

  • A small log (approximately 6-8 inches in length)
  • A drill with a 1-inch drill bit
  • Sandpaper (medium and fine grit)
  • Wood stain or paint (optional)
  • Clear sealant (optional)
  • Tea lights or small votive candles

Instructions:

  1. Prepare the log: Clean any dirt or debris from the log's surface. Use sandpaper to smooth out any rough edges.
  2. Drill the candle cavity: Center the log on a flat surface and carefully drill a hole that's slightly larger than the diameter of your candle. The depth should accommodate the candle's height.
  3. Finish (optional): If desired, apply a wood stain or paint to the log to enhance its natural beauty or add a touch of color. Once dry, apply a clear sealant to protect the wood and enhance its longevity.
  4. Place the candle: Insert your tea light or votive candle into the drilled hole and enjoy the soft glow of the candle.

This simple candle holder is a versatile piece that can be placed on a mantel, coffee table, or side table to add a touch of warmth and charm to any room.

Rustic Elegance: The Wooden Slice Candle Holder

This design showcases the unique grain patterns of wood slices, creating a rustic and elegant candle holder.

Materials Needed:

  • A wooden slice (approximately 4-6 inches in diameter)
  • A drill with a 1-inch drill bit
  • Sandpaper (medium and fine grit)
  • Wood stain or paint (optional)
  • Clear sealant (optional)
  • Tea lights or small votive candles
  • Small metal ring or decorative wire (optional)

Instructions:

  1. Prepare the wooden slice: Sand the surface of the wooden slice to smooth out any rough edges. You can choose to leave the bark on for a more natural look.
  2. Drill the candle cavity: Center the wooden slice on a flat surface and carefully drill a hole that's slightly larger than the diameter of your candle. The depth should be deep enough to accommodate the candle's height.
  3. Finish (optional): If desired, apply a wood stain or paint to the slice to enhance its natural beauty or add a touch of color. Once dry, apply a clear sealant to protect the wood and enhance its longevity.
  4. Create a decorative handle (optional): If you prefer, you can add a small metal ring or decorative wire to the top of the wooden slice to create a handle. This allows for easy moving and placement.
  5. Place the candle: Insert your tea light or votive candle into the drilled hole and enjoy the soft glow of the candle.

This elegant candle holder can be displayed on a coffee table, mantel, or even hung on a wall. It complements any rustic or farmhouse decor beautifully.

Modern Rustic: The Pallet Wood Candle Holder

This contemporary design uses repurposed pallet wood to create a unique and eco-friendly candle holder.

Materials Needed:

  • Pallet wood planks
  • Saw
  • Sandpaper (medium and fine grit)
  • Wood glue
  • Clamps
  • Wood stain or paint (optional)
  • Clear sealant (optional)
  • Tea lights or votive candles

Instructions:

  1. Cut the pallet wood: Cut the pallet wood planks into desired sizes for your candle holder base and sides. For a simple design, you could create a rectangular box shape. Alternatively, use different plank lengths for a more rustic and uneven design.
  2. Assemble the base: Join the wood planks to create the base of the candle holder. Use wood glue and clamps to ensure a secure bond.
  3. Construct the sides: Attach the side planks to the base. Ensure the sides are tall enough to accommodate your chosen candle size.
  4. Finish (optional): Sand all the surfaces of the candle holder smooth. You can choose to leave the wood in its natural state, or apply a wood stain or paint for a different look.
  5. Seal (optional): Once the finish is dry, apply a clear sealant to protect the wood and enhance its longevity.
  6. Place the candle: Set your tea light or votive candle inside the candle holder. You can place the holder directly on a surface, or you can add legs or feet for a more stable design.

This contemporary rustic design adds a unique touch to any space, making it perfect for those seeking a modern take on farmhouse decor.

Tips for Success

Here are some tips for making successful DIY wooden candle holders:

  • Choose the right wood: Select wood types that are suitable for candle holders, such as hardwoods like oak, maple, or walnut. Softwoods like pine can be more prone to burning.
  • Safety first: When drilling holes, make sure to use safety glasses and avoid drilling too close to the edges of the wood to prevent splintering.
  • Get creative with designs: Experiment with different shapes, sizes, and finishes to create unique and personalized candle holders.
  • Prioritize fire safety: Always place candle holders on a stable, heat-resistant surface and never leave them unattended. Keep flammable materials away from the lit candle.

Making your own wooden candle holders is a fun and rewarding project that allows you to express your creativity while adding a touch of rustic charm to your home. The projects described above offer various design options, each with its own unique appeal. By following these instructions, you can craft stunning candle holders that complement your rustic or farmhouse decor perfectly.

Share:

How to Build Wooden Outdoor Benches That Are Perfect for Relaxing and Entertaining

How to Build Wooden Outdoor Benches That Are Perfect for Relaxing and Entertaining

Crafting Inviting Outdoor Benches: A Guide to Relaxation and Entertainment

Outdoor benches are more than just seating; they are invitations to pause, relax, and connect with nature. Whether you envision a tranquil spot for solitary reflection or a welcoming gathering place for friends and family, building a wooden outdoor bench is a rewarding project that adds both beauty and functionality to your outdoor space. This comprehensive guide will walk you through the steps, from planning to finishing touches, ensuring you create a bench that is as durable as it is aesthetically pleasing.

Planning Your Outdoor Bench

Before you dive into the construction, careful planning is key to creating a bench that meets your needs and complements your outdoor space.

1. Determine the Purpose and Location

Consider the primary purpose of your bench:

  • Will it be a solitary retreat for reading or contemplation?
  • A gathering spot for social gatherings?
  • A focal point for a specific area of your yard?

The location will influence the design and dimensions of your bench.

  • Is the site exposed to direct sunlight or shade?
  • Are there any obstacles or features to consider, such as trees, steps, or walls?

2. Choose the Right Wood

The choice of wood is critical for durability and aesthetics.

  • Hardwoods like cedar, redwood, and teak are naturally resistant to rot, insects, and weathering. They also offer a rich, warm look.
  • Pressure-treated lumber is an affordable option that provides excellent resistance to moisture. It’s often used for the frame and supports.
  • Softwoods like pine and spruce are less durable but can be budget-friendly. They may require more frequent maintenance.

Consider the look you want to achieve. Cedar and redwood have a natural reddish hue, while teak boasts a rich, golden brown. Pine and spruce offer a light, natural look.

3. Sketch Out Your Design

Create a simple sketch or diagram of your bench, including:

  • The overall length and width
  • The height of the seat and backrest
  • The shape of the seat and backrest
  • The placement of any decorative elements or supports

This will help you visualize the final product and make informed decisions about the materials and construction techniques you’ll use.

Construction: Building Your Outdoor Bench

With your plan in hand, you’re ready to begin the construction process. Here’s a step-by-step guide:

1. Cut the Wood

Using your sketch as a guide, carefully measure and cut the wood for the bench frame, seat, backrest, and any decorative elements. If you lack a table saw, consider using a circular saw with a guide or visiting a local lumber yard for accurate cuts.

2. Assemble the Frame

The frame provides the foundation of the bench. It’s typically made of 2x4s or 4x4s, depending on the size and weight capacity of your bench.

  • Join the frame pieces using wood glue and screws. You can also use pocket hole screws, which allow for hidden joinery.
  • For added stability, consider reinforcing the corners with corner brackets or metal plates.

3. Attach the Seat and Backrest

The seat and backrest boards should be attached to the frame using screws or nails, ensuring even spacing between the boards.

  • For a comfortable seat, you can use 1x4s or 1x6s, depending on your preference.
  • The backrest can be angled slightly for added support and comfort.
  • Pre-drill holes in the boards to prevent splitting when attaching them.

4. Add Decorative Elements (Optional)

Enhance the visual appeal of your bench with decorative features such as:

  • Armrests: These can be simple extensions of the frame or more elaborate pieces of wood.
  • Latticework or Decorative Panels: Add intricate details to the backrest or sides of the bench.
  • Curved Edges: Create a softer look by rounding the corners or edges of the seat or backrest.

5. Sand and Finish the Wood

Before applying any stain or paint, sand the entire bench with progressively finer grits of sandpaper (starting with coarse and ending with fine) to create a smooth surface.

  • This will help to eliminate any splinters and create a consistent surface for the finish.
  • Always sand with the grain of the wood to prevent scratches.

6. Apply a Finish

Choosing the right finish will protect your bench from the elements and enhance its appearance. Consider these options:

  • Stain: This penetrates the wood, enhancing its natural color and grain pattern. Choose a weather-resistant stain for outdoor applications.
  • Paint: This creates a durable, opaque finish that protects the wood and allows you to add a pop of color. Use a paint formulated for outdoor use.
  • Oil or Varnish: These finishes provide a protective layer that also enhances the natural beauty of the wood.

Follow the manufacturer's instructions carefully for each finish to ensure proper application and longevity.

Enhancing Comfort and Durability

To elevate the comfort and longevity of your outdoor bench, incorporate these helpful tips:

1. Cushions and Pillows

Add cushions or pillows to your bench for extra comfort. Choose weather-resistant materials that can withstand the elements. You can even create custom cushions to match the style and color of your bench.

2. Backrest Angle

An angled backrest provides better support and comfort, especially for longer periods of sitting. Aim for a slight recline of 5-10 degrees.

3. Storage Compartment (Optional)

If you need a place to store blankets, cushions, or other outdoor essentials, consider incorporating a storage compartment beneath the seat. This can be achieved using a hinged lid or a sliding drawer.

4. Regular Maintenance

To ensure your bench lasts for years to come, dedicate a little time for routine maintenance:

  • Clean the bench regularly with a mild soap and water solution to remove dirt and debris.
  • Inspect the wood for any signs of rot, cracks, or damage. Repair any issues promptly.
  • Reapply the finish as needed to maintain its protective layer.

Finishing Touches: Adding Personal Style

Your outdoor bench is a blank canvas for your creativity. Customize it with these finishing touches:

  • Decorative hardware: Add decorative screws, bolts, or hinges to enhance the visual appeal of your bench.
  • Plantings: Surround your bench with flowers, herbs, or small shrubs for a touch of natural beauty.
  • Lighting: Integrate solar-powered lights or lanterns to create a warm ambiance in the evenings.
  • Personalized details: Add a plaque with your family name or a meaningful quote to make the bench truly unique.

By following these steps, you can build a sturdy, inviting, and personalized wooden outdoor bench that will become a cherished gathering place for years to come.

Share:

Wooden Christmas Elf Craft for Your Porch

Wooden Christmas Elf Craft for Your Porch

Add a Touch of Magic to Your Porch with a Wooden Christmas Elf Craft

It’s that time of year again! The air is crisp, the leaves are changing, and the scent of pumpkin spice fills the air. And, of course, that means it’s time to start decorating for Christmas! But before you start pulling out the same old ornaments and garlands, consider adding something unique and handmade to your holiday decor this year.

We’re talking about a charming wooden Christmas elf craft, a whimsical addition that will bring a touch of magic to your porch. This project is perfect for all skill levels, and even if you’ve never picked up a saw before, we’ll guide you through every step with easy-to-follow instructions.

Not only will you have a delightful new decoration to greet your guests, but you’ll also have the satisfaction of creating something truly special with your own two hands. So, gather your materials and let’s get crafty!

Gather Your Materials

Before you start, make sure you have all the necessary materials on hand. This will save you time and frustration later on! Here’s what you’ll need:

  • Wooden dowel rod (1/2-inch diameter, approximately 18 inches long)
  • Wooden circle (approximately 6 inches in diameter)
  • Wooden cone (approximately 6 inches tall)
  • Wood glue
  • Acrylic paint (red, green, white, brown, black, and skin tone)
  • Paint brushes
  • Scissors
  • Felt (red, green, white)
  • Hot glue gun and glue sticks
  • Twine or ribbon
  • Optional: glitter, beads, or other embellishments

You can find these materials at most craft stores or online. If you want to use recycled materials, consider using old wooden spoons, paint stirrers, or other leftover wood scraps for your project. Let’s get creative and repurpose!

Building the Elf’s Body

Let’s start with the elf’s body. This is the base of our little buddy, so take your time and get it right!

Assembling the Legs and Feet

First, grab the wooden dowel rod. This will be the elf’s legs. Cut the dowel rod in half. Now, take your wooden circle and cut it in half. These are the elf’s feet. Now, use wood glue to attach each half-circle to the bottom of the dowel rod pieces. Let the glue dry completely.

We recommend that you use a clamp or two to hold the pieces together until the glue sets. This will ensure a strong and sturdy bond.

Creating the Body

Next, take the wooden cone. This is the elf’s body. Grab the dowel rod piece with the feet attached and place it directly into the opening of the wooden cone. Use wood glue to secure it inside. Now, you’ve got the basic structure of your elf!

Bringing Your Elf to Life

Now for the fun part: painting and decorating your elf! This is where you can get creative and personalize your creation.

Painting the Elf's Body

Start by painting the wooden cone, which is the elf’s body, with your chosen skin tone. Let the paint dry completely. Then, paint the wooden dowel rod, which are the elf’s legs, a red color.

Making the Hat

Now, it’s time to make the elf’s hat! Take your red felt and cut out a circle large enough to cover the top of the wooden cone. You can use a bowl or plate as a template. Next, use your scissors to cut a curved shape from the red felt, similar to a pointy hat. Use hot glue to attach the curved shape to the circle. Carefully attach the hat to the top of the wooden cone with hot glue. Once everything is secure, you can add some white felt to the base of the hat for a festive touch.

Painting the Face

Time to paint the face! We recommend using a fine-tipped paintbrush for this part. Paint the elf’s eyes black and add a little white dot in the center to make them sparkle. Use red paint for the elf’s nose and mouth. If you want to get fancy, you can add some details like eyebrows and eyelashes. You can also draw a cute little smirk or a happy expression.

Add Some Festive Touches

Next, add some festive touches to complete your elf. Use green felt to cut out a small, pointy shape for the elf’s pointy hat. Glue it to the hat. You can also add a little white pompom to the tip of the hat for a cute touch. Now, use green felt to create a simple, festive design for the elf’s tunic. This can be stripes, polka dots, or any design you like. Attach it to the elf’s body with hot glue.

Finishing Touches

Finally, you can add some finishing touches to your elf. Use a ribbon or twine to create a belt around the elf’s waist. Add some small wooden beads or felt shapes to make the belt more festive. If you’re feeling really creative, you can also use your hot glue gun to create tiny white dots to simulate snow on the elf’s hat and body.

Tips and Tricks

Here are some tips to make your elf-making experience even more enjoyable:

  • Work in a well-ventilated area, especially if you’re using hot glue or paint.
  • Let each layer of paint dry completely before applying the next. This will prevent smudging and ensure a smooth finish.
  • Use a craft knife to cut the felt. This will give you a clean and precise cut. Use a ruler and pencil to mark the felt before cutting for more precise results.
  • Get creative with your design. Don’t be afraid to experiment with different colors, patterns, and embellishments. Let your imagination run wild!
  • Have fun! Crafting is supposed to be enjoyable, so don’t take it too seriously. If something doesn’t go exactly as planned, don’t worry - just make adjustments and keep going. You’ll have a charming elf to show for your efforts.

Commonly Asked Questions

We’ve got some answers to common questions about crafting your wooden Christmas elf.

How long does it take to make a wooden Christmas elf?

It depends on how intricate you want your elf to be. You can create a basic elf in an hour or two, or you can spend more time adding details and embellishments. The time it takes is totally up to you.

Can I make my wooden elf stand up?

Absolutely! To help your elf stand, you can attach a flat wooden base to the bottom of the dowel rod. The base should be slightly larger than the diameter of the rod. You can also attach a piece of felt to the bottom of the base to prevent slipping.

What are some other fun ideas for decorating my wooden Christmas elf?

You can use glitter glue to add a bit of sparkle to the hat or tunic. Add a small bow made from red or green ribbon to the elf’s waist. You can also add tiny bells to the elf’s hat or tunic, or create a cute little scarf using felt.

We hope you have a magical time creating your wooden Christmas elf! And if you do, be sure to share your creations with us on social media. We’d love to see your holiday masterpiece!

Share:

人気の投稿

Powered by Blogger.