Easy and budget-friendly woodworking ideas for creating personalized wood crafts and home accents.

Showing posts with label Extra. Show all posts

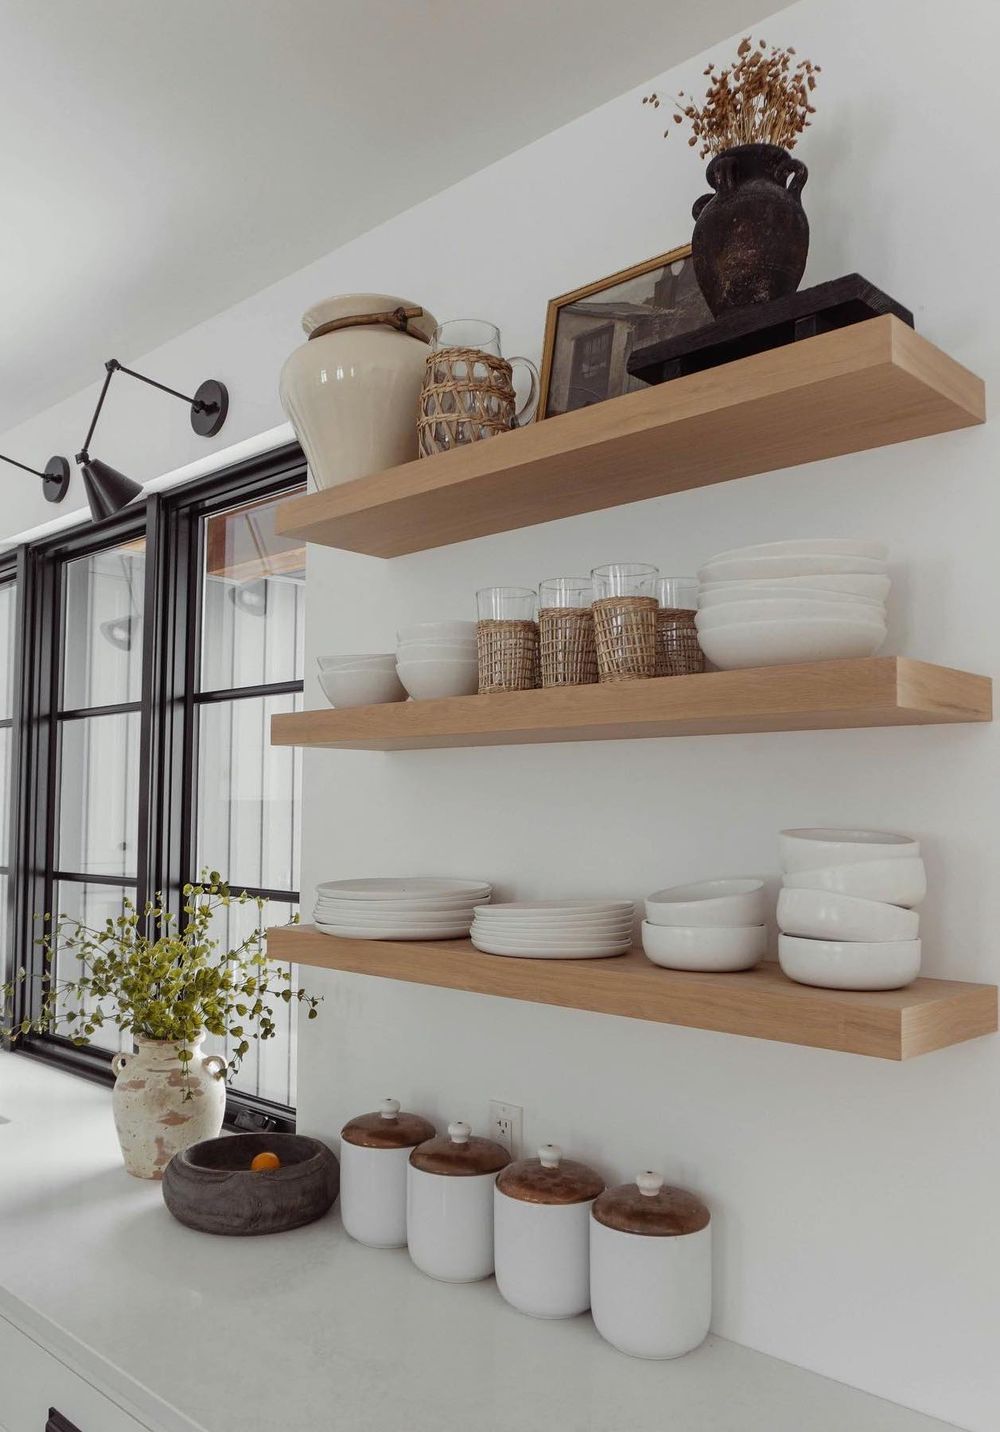
DIY Floating Shelf Ideas for a Minimalist or Modern Interior

DIY Floating Shelf Ideas for a Minimalist or Modern Interior

Elevate Your Minimalist or Modern Home with DIY Floating Shelves

Hey there, design enthusiasts! Tired of bulky bookshelves cluttering your minimalist or modern space? Floating shelves are the perfect solution to seamlessly integrate storage and style. Not only are they visually appealing, but they also offer the flexibility to create a bespoke look that complements your unique aesthetic.

The best part? You don't need to shell out big bucks for fancy pre-made shelves. With a little DIY know-how and a few simple materials, you can craft stunning floating shelves that add a touch of elegance and functionality to your home.

Floating Shelf Styles for Every Space

Before diving into the construction process, let's talk about the different styles of floating shelves you can create. Here are a few ideas to spark your creativity:

Geometric Elegance

Embrace sharp angles and clean lines with geometric floating shelves. Think triangular shapes, rectangular shelves with beveled edges, or even hexagonal designs. These shelves add a touch of modern sophistication and can be customized to fit any corner or wall space.

Industrial Chic

For a rugged and contemporary look, incorporate industrial elements like exposed pipes, metal brackets, or reclaimed wood. These shelves are perfect for showcasing vintage finds, books, or minimalist decor.

Minimalist Marvels

Keep it simple with minimalist floating shelves. Choose sleek, straightforward designs in neutral tones like white, black, or natural wood. These shelves offer a clean and uncluttered look, allowing your belongings to take center stage.

Essential Materials for Your DIY Project

Now, let's gather the essentials for your floating shelf adventure. Here's a list of materials you'll likely need:

  • Wood: Choose a wood type that complements your style. Popular options include plywood, MDF, reclaimed wood, or even bamboo for a sustainable touch.
  • Brackets: You can use L-brackets, shelf brackets, or even create custom brackets using metal piping or wood.
  • Screws and Anchors: Choose screws that are long enough to securely hold your shelves in place. Use anchors if your walls are drywall or plaster.
  • Wood Filler: For a smooth finish, use wood filler to cover any screw holes or imperfections in the wood.
  • Sandpaper: Smooth out any rough edges and prepare the surface for painting or staining.
  • Paint or Stain: This is entirely up to your personal preference and the style you're aiming for. Choose a color or stain that harmonizes with your existing decor.
  • Measuring Tape, Level, and Pencil: These tools are essential for precise marking and placement of your shelves.
  • Safety Glasses and Gloves: Always prioritize safety when working with tools.

Crafting Your Floating Shelves: A Step-by-Step Guide

Ready to bring your floating shelf vision to life? Follow these simple steps:

  1. Plan and Measure: Determine the size, shape, and number of shelves you'll create. Use a measuring tape to mark the exact location on your wall where you want to install your shelves. Make sure the placement is level for a polished look.
  2. Cut the Wood: Using a saw, carefully cut your wood to the desired dimensions. If you're working with plywood or MDF, be sure to cut with the grain for a clean, consistent cut.
  3. Install the Brackets: Mark the wall where you want to install your brackets. Use a drill to make pilot holes, then secure the brackets to the wall with the appropriate screws. Make sure the brackets are level and at the correct height for your shelves.
  4. Attach the Shelves: Place your shelves on the brackets and secure them with screws. Use wood filler to cover any screw holes for a seamless appearance. If you're using L-brackets, you can typically attach the shelves from underneath.
  5. Sand, Prime, and Finish: Sand your shelves to smooth out any rough edges. If you're painting, apply a primer before applying your chosen paint color. If you're staining, apply a wood stain for a natural and warm finish.
  6. Decorate and Enjoy! Finally, arrange your belongings and enjoy your beautiful new floating shelves. Get creative and let your personality shine through in your display.

Tips for Success

Here are a few extra tips to ensure your DIY floating shelves are a triumph:

  • Practice Makes Perfect: If you're new to DIY projects, it's always a good idea to practice cutting and assembling your shelves on scrap wood before working with your final materials.
  • Double-Check Your Measurements: Accuracy is key for a professional-looking finish. Take your time and double-check your measurements to ensure your shelves are properly aligned.
  • Use Quality Materials: Invest in durable and high-quality materials for shelves that will last. A sturdy wood base and strong brackets are essential for long-term stability.
  • Prioritize Safety: Always wear safety glasses and gloves when working with tools. Use a work surface that is stable and free of clutter.
  • Don't Be Afraid to Get Creative: Floating shelves offer endless possibilities for design and customization. Have fun with it and let your imagination run wild!

Commonly Asked Questions

We've addressed some of the most common questions about DIY floating shelves. Let's dive into these FAQs:

What if my walls are drywall?

Drywall is a common wall material, and you'll need to use anchors to ensure your floating shelves are securely mounted. There are many types of anchors available, so choose ones that are appropriate for the weight of your shelves and the thickness of your drywall. Follow the instructions on the anchor packaging for proper installation.

How do I choose the right brackets?

The type of brackets you choose will depend on the weight of your shelves and the style you're going for. L-brackets are a common choice for lightweight shelves, while shelf brackets or custom-made brackets are better suited for heavier loads. Consider the thickness of your shelves and the material they're made from when choosing brackets.

What if my shelves aren't perfectly level?

A level is your best friend for this project. Use a level to ensure your brackets are installed at the same height and that your shelves are perfectly horizontal. If your shelves are slightly off, you can adjust them by adding shims or spacers underneath.

Can I use floating shelves for anything?

Absolutely! Floating shelves are incredibly versatile and can be used for a wide range of purposes. Here are a few ideas:

  • Bookshelf: Showcase your favorite books or create a cozy reading nook.
  • Display Shelf: Arrange decorative items, art pieces, or family photos.
  • Kitchen Storage: Organize spices, cookbooks, or decorative plates.
  • Bathroom Organizer: Store towels, toiletries, or decorative baskets.
  • Bedroom Accent: Add a touch of style with nightstands, plant shelves, or jewelry organizers.

So, get ready to embrace the minimalist or modern aesthetic in your home with these DIY floating shelf ideas! Remember, the key is to choose materials that reflect your style and to have fun with the process. With a little creativity and effort, you can create a stunning and functional storage solution that elevates your space.

Share:

DIY Wooden Candle Holders to Complement Your Rustic or Farmhouse Decor

DIY Wooden Candle Holders to Complement Your Rustic or Farmhouse Decor

DIY Wooden Candle Holders to Complement Your Rustic or Farmhouse Decor

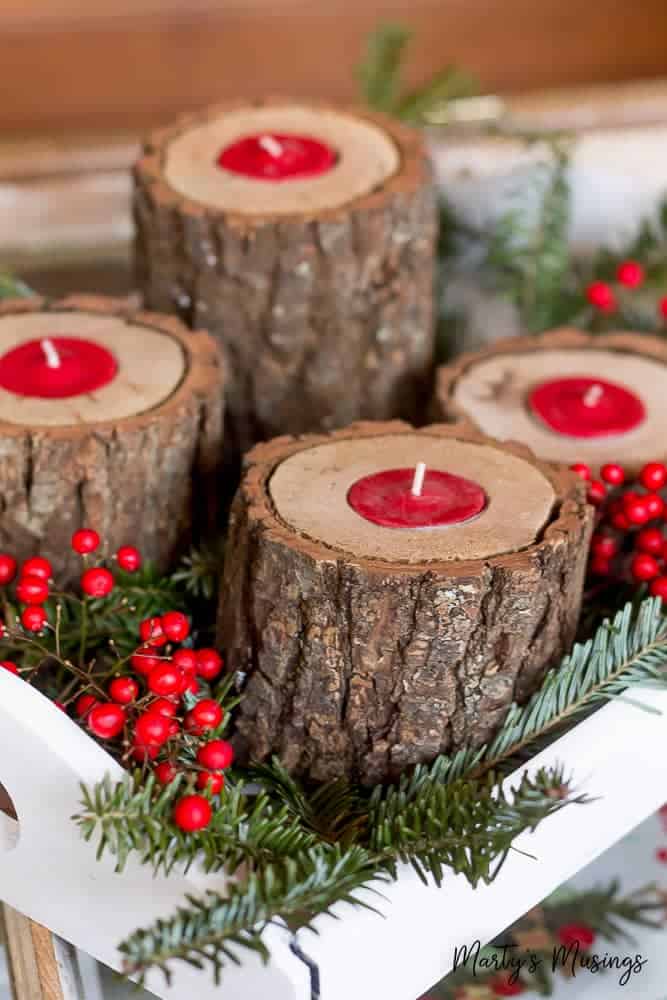
Rustic and farmhouse decor have become increasingly popular in recent years, with their warm, inviting, and natural aesthetic. A key element of this style is the use of wood, and incorporating wooden candle holders is a great way to add a touch of rustic charm to your home. Not only are they visually appealing, but they also offer a cozy and welcoming ambiance. This article will guide you through the creation of several DIY wooden candle holders, each with unique designs to complement your rustic or farmhouse decor.

Simple and Elegant: The Rustic Log Candle Holder

This project utilizes the natural beauty of wood to create a simple yet elegant candle holder.

Materials Needed:

  • A small log (approximately 6-8 inches in length)
  • A drill with a 1-inch drill bit
  • Sandpaper (medium and fine grit)
  • Wood stain or paint (optional)
  • Clear sealant (optional)
  • Tea lights or small votive candles

Instructions:

  1. Prepare the log: Clean any dirt or debris from the log's surface. Use sandpaper to smooth out any rough edges.
  2. Drill the candle cavity: Center the log on a flat surface and carefully drill a hole that's slightly larger than the diameter of your candle. The depth should accommodate the candle's height.
  3. Finish (optional): If desired, apply a wood stain or paint to the log to enhance its natural beauty or add a touch of color. Once dry, apply a clear sealant to protect the wood and enhance its longevity.
  4. Place the candle: Insert your tea light or votive candle into the drilled hole and enjoy the soft glow of the candle.

This simple candle holder is a versatile piece that can be placed on a mantel, coffee table, or side table to add a touch of warmth and charm to any room.

Rustic Elegance: The Wooden Slice Candle Holder

This design showcases the unique grain patterns of wood slices, creating a rustic and elegant candle holder.

Materials Needed:

  • A wooden slice (approximately 4-6 inches in diameter)
  • A drill with a 1-inch drill bit
  • Sandpaper (medium and fine grit)
  • Wood stain or paint (optional)
  • Clear sealant (optional)
  • Tea lights or small votive candles
  • Small metal ring or decorative wire (optional)

Instructions:

  1. Prepare the wooden slice: Sand the surface of the wooden slice to smooth out any rough edges. You can choose to leave the bark on for a more natural look.
  2. Drill the candle cavity: Center the wooden slice on a flat surface and carefully drill a hole that's slightly larger than the diameter of your candle. The depth should be deep enough to accommodate the candle's height.
  3. Finish (optional): If desired, apply a wood stain or paint to the slice to enhance its natural beauty or add a touch of color. Once dry, apply a clear sealant to protect the wood and enhance its longevity.
  4. Create a decorative handle (optional): If you prefer, you can add a small metal ring or decorative wire to the top of the wooden slice to create a handle. This allows for easy moving and placement.
  5. Place the candle: Insert your tea light or votive candle into the drilled hole and enjoy the soft glow of the candle.

This elegant candle holder can be displayed on a coffee table, mantel, or even hung on a wall. It complements any rustic or farmhouse decor beautifully.

Modern Rustic: The Pallet Wood Candle Holder

This contemporary design uses repurposed pallet wood to create a unique and eco-friendly candle holder.

Materials Needed:

  • Pallet wood planks
  • Saw
  • Sandpaper (medium and fine grit)
  • Wood glue
  • Clamps
  • Wood stain or paint (optional)
  • Clear sealant (optional)
  • Tea lights or votive candles

Instructions:

  1. Cut the pallet wood: Cut the pallet wood planks into desired sizes for your candle holder base and sides. For a simple design, you could create a rectangular box shape. Alternatively, use different plank lengths for a more rustic and uneven design.
  2. Assemble the base: Join the wood planks to create the base of the candle holder. Use wood glue and clamps to ensure a secure bond.
  3. Construct the sides: Attach the side planks to the base. Ensure the sides are tall enough to accommodate your chosen candle size.
  4. Finish (optional): Sand all the surfaces of the candle holder smooth. You can choose to leave the wood in its natural state, or apply a wood stain or paint for a different look.
  5. Seal (optional): Once the finish is dry, apply a clear sealant to protect the wood and enhance its longevity.
  6. Place the candle: Set your tea light or votive candle inside the candle holder. You can place the holder directly on a surface, or you can add legs or feet for a more stable design.

This contemporary rustic design adds a unique touch to any space, making it perfect for those seeking a modern take on farmhouse decor.

Tips for Success

Here are some tips for making successful DIY wooden candle holders:

  • Choose the right wood: Select wood types that are suitable for candle holders, such as hardwoods like oak, maple, or walnut. Softwoods like pine can be more prone to burning.
  • Safety first: When drilling holes, make sure to use safety glasses and avoid drilling too close to the edges of the wood to prevent splintering.
  • Get creative with designs: Experiment with different shapes, sizes, and finishes to create unique and personalized candle holders.
  • Prioritize fire safety: Always place candle holders on a stable, heat-resistant surface and never leave them unattended. Keep flammable materials away from the lit candle.

Making your own wooden candle holders is a fun and rewarding project that allows you to express your creativity while adding a touch of rustic charm to your home. The projects described above offer various design options, each with its own unique appeal. By following these instructions, you can craft stunning candle holders that complement your rustic or farmhouse decor perfectly.

Share:

Custom Wood Sign Projects That Shoppers Can't Resist

Custom Wood Sign Projects That Shoppers Can't Resist

Custom Wood Sign Projects That Shoppers Can't Resist

In the realm of home décor, custom wood signs have emerged as a captivating trend, capturing the hearts and wallets of discerning shoppers. These handcrafted masterpieces offer a unique blend of artistry, personalization, and rustic charm, making them irresistible additions to any space. From welcoming entryway signs to whimsical kitchen décor, the possibilities are endless, allowing individuals to express their personal style and create a truly one-of-a-kind ambiance.

The Allure of Custom Wood Signs

The appeal of custom wood signs lies in their ability to transcend mere decoration, becoming cherished expressions of individuality. These signs are not merely mass-produced items; they are handcrafted pieces imbued with the artist's touch and the customer's vision. They tell stories, reflect passions, and create a sense of warmth and personality that is simply unmatched by mass-produced alternatives.

Uniqueness and Personalization

Unlike generic signs found in big-box stores, custom wood signs allow customers to tailor every aspect of their creation. From the choice of wood species and stain to the font, colors, and overall design, the possibilities are boundless. Shoppers can incorporate personal touches like family names, special dates, meaningful quotes, or even their favorite hobbies, making each sign a truly unique and irreplaceable treasure.

Rustic Charm and Natural Beauty

Wood itself possesses an inherent allure, exuding a timeless elegance and rustic charm that complements a wide range of décor styles. The natural grain patterns and variations in color add depth and character to each sign, creating a warm and inviting ambiance. This organic beauty harmonizes seamlessly with contemporary, farmhouse, and traditional interiors, enhancing the overall aesthetic appeal.

Handcrafted Quality and Durability

Custom wood signs are not mass-produced; they are meticulously crafted by skilled artisans who take pride in their work. Each sign is carefully designed, cut, sanded, stained, and finished by hand, ensuring a high level of quality and durability. This meticulous attention to detail ensures that these signs will stand the test of time, becoming treasured family heirlooms that can be passed down for generations.

Popular Custom Wood Sign Projects

The realm of custom wood signs is as diverse as the shoppers who commission them. Here are some of the most popular and sought-after projects that continue to captivate customers:

Entryway Signs

First impressions matter, and a custom entryway sign sets the tone for the entire home. Shoppers can personalize these signs with their family name, a welcoming message, or a decorative motif that reflects their style. From elegant farmhouse chic to rustic country charm, entryway signs instantly add a touch of warmth and personality to the front door.

Kitchen Signs

The kitchen is often the heart of the home, and custom wood signs can add a touch of whimsy and functionality to this bustling space. Popular kitchen signs include those featuring motivational quotes, recipe lists, or humorous sayings. These signs can be displayed on the wall, above the stove, or even hanging from a rustic rack. The options are endless, and they can be tailored to match any kitchen's design and personality.

Bathroom Signs

Bathrooms are a haven for relaxation and rejuvenation, and custom wood signs can enhance this peaceful atmosphere. Signs featuring inspirational quotes, spa-like imagery, or simple messages like "Relax" or "Peace" create a serene ambiance. These signs can be placed above the bathtub, on the vanity, or even hung on a towel rack.

Bedroom Signs

The bedroom is a sanctuary for rest and rejuvenation, and custom wood signs can add a personal touch to this intimate space. Signs featuring inspirational quotes, meaningful messages, or even just a simple "Welcome" message create a warm and inviting atmosphere. These signs can be displayed above the bed, on the nightstand, or even hung on the wall behind the headboard.

Personalized Gifts

Custom wood signs make exceptional gifts for birthdays, holidays, housewarming parties, and other special occasions. They are a thoughtful and personalized way to show your love and appreciation. Some popular personalized gift signs include those featuring family names, wedding dates, or meaningful quotes that reflect the recipient's personality or interests.

Crafting Custom Wood Signs: Tips for Success

For those interested in creating their own custom wood signs, here are some tips to ensure success:

Choose the Right Wood

Wood species like pine, cedar, and oak are popular choices for custom signs. Pine is a softwood that is easy to work with, while cedar has a pleasant aroma and natural resistance to decay. Oak is a hardwood that is known for its strength and durability. Consider the style of the sign and the desired aesthetic when selecting the wood.

Design the Sign

Start by sketching out the design on paper. Determine the size, shape, and layout of the sign. Consider the font, colors, and any decorative elements you want to incorporate. Use design software or online templates for inspiration and to refine your ideas.

Prepare the Wood

Sand the wood to create a smooth surface. Use a variety of grits to achieve the desired texture. If you are using stain, apply a coat of wood conditioner to ensure even absorption. Allow the wood to dry completely before moving on to the next step.

Cut and Assemble

Use a saw or jigsaw to cut the wood to the desired shape. If the sign is large, consider using a router to create decorative edges or to create a frame. If the sign has multiple parts, assemble them using wood glue and clamps. Allow the glue to dry completely before moving on to the next step.

Apply Stain and Paint

Apply the stain or paint to the wood using a brush, roller, or spray gun. Use multiple coats for a richer finish. If you are using multiple colors, allow each coat to dry completely before applying the next. Consider using a sealant to protect the sign from moisture and wear. Allow the sealant to dry completely before handling the sign.

Finishing Touches

Once the paint or stain is dry, add any embellishments you have planned. Use a stencil to create designs, or use stencils to write words or add lettering. Use a drill to create holes for hanging the sign.

Conclusion

Custom wood signs are more than just decorative pieces; they are expressions of individuality, cherished keepsakes, and unique additions to any home. Whether you're a seasoned crafter or a beginner just starting out, the world of custom wood signs offers endless opportunities to create something beautiful and meaningful. By following these tips, you can create stunning custom wood signs that will be treasured for years to come.

Share:

Floating Shelves in Your Bedroom: Design and Installation Tips

Floating Shelves in Your Bedroom: Design and Installation Tips

Floating Shelves in Your Bedroom: Design and Installation Tips

Transform your bedroom into a haven of style and functionality with the addition of floating shelves. These sleek and minimalist shelves offer a unique way to display your favorite books, plants, and decorative items while adding a touch of contemporary flair to your space. But before you embark on your floating shelf journey, it's crucial to consider both design and installation aspects to ensure a successful and aesthetically pleasing outcome.

Design Considerations for Floating Shelves

The beauty of floating shelves lies in their versatility. You can customize them to fit your personal style and the specific needs of your bedroom. Think about the following factors as you plan your floating shelf design:

1. Determine Your Shelf Purpose

Are you aiming for a display-focused design? Do you need a practical storage solution for books, clothes, or other items? Or are you looking for a combination of both? Identifying the primary function of your floating shelves will guide your size, material, and placement decisions.

2. Choose the Right Size and Shape

Floating shelves come in various sizes and shapes, from narrow and compact to wide and expansive. For a dramatic visual impact, consider varying the sizes of your shelves to create a dynamic display. For smaller spaces, opt for thinner, narrower shelves to avoid overwhelming the room.

3. Select the Ideal Material

Floating shelves are available in a diverse range of materials, each with its own aesthetic appeal and durability. Here are some popular options:

  • Wood: Offers warmth and classic charm, available in various stains and finishes.
  • Metal: Provides a sleek and modern look, often in black, silver, or brass finishes.
  • Glass: Creates a contemporary and airy feel, perfect for showcasing delicate items.
  • Acrylic: Provides a clear, almost invisible appearance, ideal for minimalistic décor.

4. Consider the Placement

Strategic placement of your floating shelves is essential for creating a balanced and visually appealing arrangement. Consider these tips:

  • Above the Bedside Table: Place a floating shelf above your bedside table to create a convenient spot for books, lamps, or small plants.
  • Over the Bed: A floating shelf over the headboard can add a decorative element and create a focal point for your bedroom.
  • In a Corner: Utilize a corner space by installing a floating shelf to maximize storage and display opportunities.
  • Along a Wall: Create a gallery wall effect by placing multiple floating shelves in a row to showcase your favorite artwork or souvenirs.

Installation Tips for Floating Shelves

Installing floating shelves may seem daunting at first, but with careful planning and the right tools, you can achieve professional-looking results. Here's a step-by-step guide to help you through the process:

1. Mark the Wall

Start by carefully marking the wall where you want your shelves to be installed. Use a level to ensure that the shelves are perfectly horizontal.

2. Drill Pilot Holes

To prevent cracking the wall, use a drill bit that's slightly smaller than the screw size. Drill pilot holes at the marked locations to guide the screws.

3. Install the Brackets

Align the brackets with the pilot holes and carefully screw them into the wall. Make sure to use the appropriate screws for the type of wall material you're working with.

4. Attach the Shelves

Slide the shelves onto the installed brackets, ensuring they are securely in place. You may need to use a level to ensure that the shelves are perfectly horizontal.

5. Secure the Shelves

To ensure that the shelves stay securely in place, use a drill and appropriate screws to attach the shelves to the brackets.

Additional Considerations

As you embark on your floating shelf installation journey, keep these factors in mind:

  • Weight Capacity: Consider the weight you plan to place on your floating shelves and choose shelves with adequate weight capacity.
  • Safety Precautions: Always use appropriate safety gear, such as safety glasses and gloves, during installation.
  • Professional Installation: For larger or more complex installations, consider hiring a professional to ensure that the shelves are installed securely and accurately.

Floating shelves offer an exceptional opportunity to personalize your bedroom and create a space that reflects your unique style and personality. By carefully planning your design and following these installation tips, you can easily enhance the functionality and aesthetics of your bedroom with these elegant and versatile additions.

Share:

How to Build Wooden Outdoor Benches That Are Perfect for Relaxing and Entertaining

How to Build Wooden Outdoor Benches That Are Perfect for Relaxing and Entertaining

Crafting Inviting Outdoor Benches: A Guide to Relaxation and Entertainment

Outdoor benches are more than just seating; they are invitations to pause, relax, and connect with nature. Whether you envision a tranquil spot for solitary reflection or a welcoming gathering place for friends and family, building a wooden outdoor bench is a rewarding project that adds both beauty and functionality to your outdoor space. This comprehensive guide will walk you through the steps, from planning to finishing touches, ensuring you create a bench that is as durable as it is aesthetically pleasing.

Planning Your Outdoor Bench

Before you dive into the construction, careful planning is key to creating a bench that meets your needs and complements your outdoor space.

1. Determine the Purpose and Location

Consider the primary purpose of your bench:

  • Will it be a solitary retreat for reading or contemplation?
  • A gathering spot for social gatherings?
  • A focal point for a specific area of your yard?

The location will influence the design and dimensions of your bench.

  • Is the site exposed to direct sunlight or shade?
  • Are there any obstacles or features to consider, such as trees, steps, or walls?

2. Choose the Right Wood

The choice of wood is critical for durability and aesthetics.

  • Hardwoods like cedar, redwood, and teak are naturally resistant to rot, insects, and weathering. They also offer a rich, warm look.
  • Pressure-treated lumber is an affordable option that provides excellent resistance to moisture. It’s often used for the frame and supports.
  • Softwoods like pine and spruce are less durable but can be budget-friendly. They may require more frequent maintenance.

Consider the look you want to achieve. Cedar and redwood have a natural reddish hue, while teak boasts a rich, golden brown. Pine and spruce offer a light, natural look.

3. Sketch Out Your Design

Create a simple sketch or diagram of your bench, including:

  • The overall length and width
  • The height of the seat and backrest
  • The shape of the seat and backrest
  • The placement of any decorative elements or supports

This will help you visualize the final product and make informed decisions about the materials and construction techniques you’ll use.

Construction: Building Your Outdoor Bench

With your plan in hand, you’re ready to begin the construction process. Here’s a step-by-step guide:

1. Cut the Wood

Using your sketch as a guide, carefully measure and cut the wood for the bench frame, seat, backrest, and any decorative elements. If you lack a table saw, consider using a circular saw with a guide or visiting a local lumber yard for accurate cuts.

2. Assemble the Frame

The frame provides the foundation of the bench. It’s typically made of 2x4s or 4x4s, depending on the size and weight capacity of your bench.

  • Join the frame pieces using wood glue and screws. You can also use pocket hole screws, which allow for hidden joinery.
  • For added stability, consider reinforcing the corners with corner brackets or metal plates.

3. Attach the Seat and Backrest

The seat and backrest boards should be attached to the frame using screws or nails, ensuring even spacing between the boards.

  • For a comfortable seat, you can use 1x4s or 1x6s, depending on your preference.
  • The backrest can be angled slightly for added support and comfort.
  • Pre-drill holes in the boards to prevent splitting when attaching them.

4. Add Decorative Elements (Optional)

Enhance the visual appeal of your bench with decorative features such as:

  • Armrests: These can be simple extensions of the frame or more elaborate pieces of wood.
  • Latticework or Decorative Panels: Add intricate details to the backrest or sides of the bench.
  • Curved Edges: Create a softer look by rounding the corners or edges of the seat or backrest.

5. Sand and Finish the Wood

Before applying any stain or paint, sand the entire bench with progressively finer grits of sandpaper (starting with coarse and ending with fine) to create a smooth surface.

  • This will help to eliminate any splinters and create a consistent surface for the finish.
  • Always sand with the grain of the wood to prevent scratches.

6. Apply a Finish

Choosing the right finish will protect your bench from the elements and enhance its appearance. Consider these options:

  • Stain: This penetrates the wood, enhancing its natural color and grain pattern. Choose a weather-resistant stain for outdoor applications.
  • Paint: This creates a durable, opaque finish that protects the wood and allows you to add a pop of color. Use a paint formulated for outdoor use.
  • Oil or Varnish: These finishes provide a protective layer that also enhances the natural beauty of the wood.

Follow the manufacturer's instructions carefully for each finish to ensure proper application and longevity.

Enhancing Comfort and Durability

To elevate the comfort and longevity of your outdoor bench, incorporate these helpful tips:

1. Cushions and Pillows

Add cushions or pillows to your bench for extra comfort. Choose weather-resistant materials that can withstand the elements. You can even create custom cushions to match the style and color of your bench.

2. Backrest Angle

An angled backrest provides better support and comfort, especially for longer periods of sitting. Aim for a slight recline of 5-10 degrees.

3. Storage Compartment (Optional)

If you need a place to store blankets, cushions, or other outdoor essentials, consider incorporating a storage compartment beneath the seat. This can be achieved using a hinged lid or a sliding drawer.

4. Regular Maintenance

To ensure your bench lasts for years to come, dedicate a little time for routine maintenance:

  • Clean the bench regularly with a mild soap and water solution to remove dirt and debris.
  • Inspect the wood for any signs of rot, cracks, or damage. Repair any issues promptly.
  • Reapply the finish as needed to maintain its protective layer.

Finishing Touches: Adding Personal Style

Your outdoor bench is a blank canvas for your creativity. Customize it with these finishing touches:

  • Decorative hardware: Add decorative screws, bolts, or hinges to enhance the visual appeal of your bench.
  • Plantings: Surround your bench with flowers, herbs, or small shrubs for a touch of natural beauty.
  • Lighting: Integrate solar-powered lights or lanterns to create a warm ambiance in the evenings.
  • Personalized details: Add a plaque with your family name or a meaningful quote to make the bench truly unique.

By following these steps, you can build a sturdy, inviting, and personalized wooden outdoor bench that will become a cherished gathering place for years to come.

Share:

Creative Wood Crafts That Shoppers Can’t Resist

Creative Wood Crafts That Shoppers Can’t Resist

Creative Wood Crafts That Shoppers Can’t Resist

In the realm of craftsmanship, wood holds a special place. Its natural beauty, versatility, and timeless appeal have captivated artisans for centuries. From rustic farmhouse décor to sleek contemporary furniture, wood crafts have a unique ability to transform spaces and evoke emotions.

For those looking to tap into this market, understanding what shoppers crave is crucial. Trends come and go, but the enduring appeal of handcrafted wooden items remains strong. Here's a glimpse into the creative wood crafts that shoppers can't resist.

Personalized Wooden Gifts

The power of personalization is undeniable. When a gift goes beyond generic and becomes a unique expression of thoughtfulness, it creates a lasting impression. Wooden gifts, with their inherent warmth and character, lend themselves beautifully to customization.

Engraved Wooden Boxes

These versatile boxes can hold jewelry, keepsakes, or even special notes. They can be engraved with names, dates, or meaningful quotes, making them perfect for anniversaries, birthdays, or other special occasions.

Custom Wooden Signs

From home décor to business signage, wooden signs offer a rustic charm that complements various styles. Personalized with names, addresses, or inspirational messages, they become unique statement pieces.

Personalized Wooden Ornaments

For the holiday season, engraved ornaments become cherished keepsakes. They can feature family names, dates, or special messages, adding a sentimental touch to Christmas trees and other festive displays.

Functional Wooden Home Decor

Beyond aesthetics, shoppers seek practicality in their home décor. Wooden items that serve a purpose while adding beauty are highly coveted.

Wooden Serving Trays

These versatile trays can be used for serving appetizers, cocktails, or even breakfast in bed. Their natural warmth complements a variety of table settings.

Wooden Cutting Boards

From simple designs to intricate carvings, wooden cutting boards are both functional and decorative. They add a touch of rustic charm to any kitchen.

Wooden Coasters

Stylish and practical, wooden coasters protect surfaces from heat and moisture. They can be crafted in various shapes and sizes, adding a touch of elegance to any coffee table or bar cart.

Unique and Quirky Wooden Pieces

Shoppers are increasingly drawn to items that stand out from the crowd. Unique and quirky wooden crafts capture attention and spark conversation.

Wooden Animal Sculptures

These can range from whimsical figures to realistic representations, adding a touch of whimsy to homes and gardens. They make fantastic conversation starters.

Wooden Wall Art

Beyond traditional paintings, shoppers are embracing unique wooden wall art. This could include abstract designs, geometric patterns, or even reclaimed wood pieces with natural imperfections.

Wooden Jewelry Holders

These can be designed in various shapes and sizes, from simple hooks to elaborate tree branches. They offer a stylish way to organize and display jewelry.

Sustainable and Eco-Friendly Wood Crafts

As consumers become more aware of environmental impact, they seek products that align with their values. Sustainable and eco-friendly wood crafts are gaining popularity.

Reclaimed Wood Furniture

Giving new life to old wood reduces waste and creates unique pieces with character. Reclaimed wood furniture often features visible knots and imperfections, adding to its charm.

Wooden Toys Made from Sustainable Wood

These toys are safe, durable, and eco-friendly. They encourage imaginative play and promote sustainability.

Wood-Burning Art

This technique uses heat to create intricate designs on wood surfaces. It is a unique and sustainable art form that uses minimal materials.

Tips for Creating Wood Crafts That Sell

To make your wood crafts irresistible to shoppers, consider these key factors:

Quality Materials

Use high-quality wood that is durable and aesthetically pleasing. Choose species that are known for their strength, grain patterns, and natural beauty.

Craftsmanship and Detail

Pay attention to detail in every step of the crafting process. Smooth surfaces, clean lines, and precise cuts create a professional finish.

Unique Designs and Styles

Offer a variety of designs to cater to different tastes and preferences. Incorporate unique elements such as carvings, inlays, or contrasting wood species to create visual interest.

Functionality and Versatility

Ensure that your crafts are functional and versatile. Design pieces that can be used in multiple ways, such as serving trays that can also be used as decorative wall art.

Storytelling and Origin

Share the story behind your crafts. Highlight the source of the wood, the crafting process, and any unique details that make your pieces stand out.

Marketing and Branding

Create a strong brand identity that reflects the quality and uniqueness of your wood crafts. Use high-quality photography to showcase your work, and engage with potential customers on social media.

By understanding the evolving preferences of shoppers and implementing creative approaches, wood crafters can tap into a thriving market filled with opportunities. Crafting beautiful, functional, and unique wooden items that evoke emotions and create lasting impressions is the key to building a successful business in the world of handmade goods.

Share:

Wooden Christmas Elf Craft for Your Porch

Wooden Christmas Elf Craft for Your Porch

Add a Touch of Magic to Your Porch with a Wooden Christmas Elf Craft

It’s that time of year again! The air is crisp, the leaves are changing, and the scent of pumpkin spice fills the air. And, of course, that means it’s time to start decorating for Christmas! But before you start pulling out the same old ornaments and garlands, consider adding something unique and handmade to your holiday decor this year.

We’re talking about a charming wooden Christmas elf craft, a whimsical addition that will bring a touch of magic to your porch. This project is perfect for all skill levels, and even if you’ve never picked up a saw before, we’ll guide you through every step with easy-to-follow instructions.

Not only will you have a delightful new decoration to greet your guests, but you’ll also have the satisfaction of creating something truly special with your own two hands. So, gather your materials and let’s get crafty!

Gather Your Materials

Before you start, make sure you have all the necessary materials on hand. This will save you time and frustration later on! Here’s what you’ll need:

  • Wooden dowel rod (1/2-inch diameter, approximately 18 inches long)
  • Wooden circle (approximately 6 inches in diameter)
  • Wooden cone (approximately 6 inches tall)
  • Wood glue
  • Acrylic paint (red, green, white, brown, black, and skin tone)
  • Paint brushes
  • Scissors
  • Felt (red, green, white)
  • Hot glue gun and glue sticks
  • Twine or ribbon
  • Optional: glitter, beads, or other embellishments

You can find these materials at most craft stores or online. If you want to use recycled materials, consider using old wooden spoons, paint stirrers, or other leftover wood scraps for your project. Let’s get creative and repurpose!

Building the Elf’s Body

Let’s start with the elf’s body. This is the base of our little buddy, so take your time and get it right!

Assembling the Legs and Feet

First, grab the wooden dowel rod. This will be the elf’s legs. Cut the dowel rod in half. Now, take your wooden circle and cut it in half. These are the elf’s feet. Now, use wood glue to attach each half-circle to the bottom of the dowel rod pieces. Let the glue dry completely.

We recommend that you use a clamp or two to hold the pieces together until the glue sets. This will ensure a strong and sturdy bond.

Creating the Body

Next, take the wooden cone. This is the elf’s body. Grab the dowel rod piece with the feet attached and place it directly into the opening of the wooden cone. Use wood glue to secure it inside. Now, you’ve got the basic structure of your elf!

Bringing Your Elf to Life

Now for the fun part: painting and decorating your elf! This is where you can get creative and personalize your creation.

Painting the Elf's Body

Start by painting the wooden cone, which is the elf’s body, with your chosen skin tone. Let the paint dry completely. Then, paint the wooden dowel rod, which are the elf’s legs, a red color.

Making the Hat

Now, it’s time to make the elf’s hat! Take your red felt and cut out a circle large enough to cover the top of the wooden cone. You can use a bowl or plate as a template. Next, use your scissors to cut a curved shape from the red felt, similar to a pointy hat. Use hot glue to attach the curved shape to the circle. Carefully attach the hat to the top of the wooden cone with hot glue. Once everything is secure, you can add some white felt to the base of the hat for a festive touch.

Painting the Face

Time to paint the face! We recommend using a fine-tipped paintbrush for this part. Paint the elf’s eyes black and add a little white dot in the center to make them sparkle. Use red paint for the elf’s nose and mouth. If you want to get fancy, you can add some details like eyebrows and eyelashes. You can also draw a cute little smirk or a happy expression.

Add Some Festive Touches

Next, add some festive touches to complete your elf. Use green felt to cut out a small, pointy shape for the elf’s pointy hat. Glue it to the hat. You can also add a little white pompom to the tip of the hat for a cute touch. Now, use green felt to create a simple, festive design for the elf’s tunic. This can be stripes, polka dots, or any design you like. Attach it to the elf’s body with hot glue.

Finishing Touches

Finally, you can add some finishing touches to your elf. Use a ribbon or twine to create a belt around the elf’s waist. Add some small wooden beads or felt shapes to make the belt more festive. If you’re feeling really creative, you can also use your hot glue gun to create tiny white dots to simulate snow on the elf’s hat and body.

Tips and Tricks

Here are some tips to make your elf-making experience even more enjoyable:

  • Work in a well-ventilated area, especially if you’re using hot glue or paint.
  • Let each layer of paint dry completely before applying the next. This will prevent smudging and ensure a smooth finish.
  • Use a craft knife to cut the felt. This will give you a clean and precise cut. Use a ruler and pencil to mark the felt before cutting for more precise results.
  • Get creative with your design. Don’t be afraid to experiment with different colors, patterns, and embellishments. Let your imagination run wild!
  • Have fun! Crafting is supposed to be enjoyable, so don’t take it too seriously. If something doesn’t go exactly as planned, don’t worry - just make adjustments and keep going. You’ll have a charming elf to show for your efforts.

Commonly Asked Questions

We’ve got some answers to common questions about crafting your wooden Christmas elf.

How long does it take to make a wooden Christmas elf?

It depends on how intricate you want your elf to be. You can create a basic elf in an hour or two, or you can spend more time adding details and embellishments. The time it takes is totally up to you.

Can I make my wooden elf stand up?

Absolutely! To help your elf stand, you can attach a flat wooden base to the bottom of the dowel rod. The base should be slightly larger than the diameter of the rod. You can also attach a piece of felt to the bottom of the base to prevent slipping.

What are some other fun ideas for decorating my wooden Christmas elf?

You can use glitter glue to add a bit of sparkle to the hat or tunic. Add a small bow made from red or green ribbon to the elf’s waist. You can also add tiny bells to the elf’s hat or tunic, or create a cute little scarf using felt.

We hope you have a magical time creating your wooden Christmas elf! And if you do, be sure to share your creations with us on social media. We’d love to see your holiday masterpiece!

Share:

人気の投稿

Powered by Blogger.