DIY Wooden Candle Holders to Complement Your Rustic or Farmhouse Decor
Rustic and farmhouse decor have become increasingly popular in recent years, with their warm, inviting, and natural aesthetic. A key element of this style is the use of wood, and incorporating wooden candle holders is a great way to add a touch of rustic charm to your home. Not only are they visually appealing, but they also offer a cozy and welcoming ambiance. This article will guide you through the creation of several DIY wooden candle holders, each with unique designs to complement your rustic or farmhouse decor.
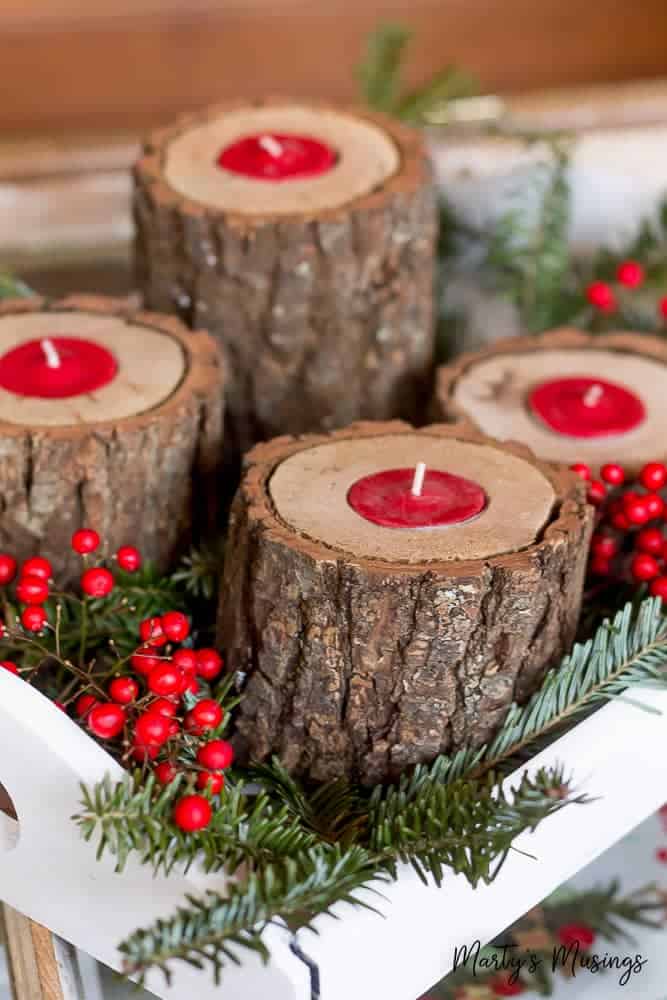
Simple and Elegant: The Rustic Log Candle Holder
This project utilizes the natural beauty of wood to create a simple yet elegant candle holder.
Materials Needed:
- A small log (approximately 6-8 inches in length)
- A drill with a 1-inch drill bit
- Sandpaper (medium and fine grit)
- Wood stain or paint (optional)
- Clear sealant (optional)
- Tea lights or small votive candles
Instructions:
- Prepare the log: Clean any dirt or debris from the log's surface. Use sandpaper to smooth out any rough edges.
- Drill the candle cavity: Center the log on a flat surface and carefully drill a hole that's slightly larger than the diameter of your candle. The depth should accommodate the candle's height.
- Finish (optional): If desired, apply a wood stain or paint to the log to enhance its natural beauty or add a touch of color. Once dry, apply a clear sealant to protect the wood and enhance its longevity.
- Place the candle: Insert your tea light or votive candle into the drilled hole and enjoy the soft glow of the candle.
This simple candle holder is a versatile piece that can be placed on a mantel, coffee table, or side table to add a touch of warmth and charm to any room.
Rustic Elegance: The Wooden Slice Candle Holder
This design showcases the unique grain patterns of wood slices, creating a rustic and elegant candle holder.
Materials Needed:
- A wooden slice (approximately 4-6 inches in diameter)
- A drill with a 1-inch drill bit
- Sandpaper (medium and fine grit)
- Wood stain or paint (optional)
- Clear sealant (optional)
- Tea lights or small votive candles
- Small metal ring or decorative wire (optional)
Instructions:
- Prepare the wooden slice: Sand the surface of the wooden slice to smooth out any rough edges. You can choose to leave the bark on for a more natural look.
- Drill the candle cavity: Center the wooden slice on a flat surface and carefully drill a hole that's slightly larger than the diameter of your candle. The depth should be deep enough to accommodate the candle's height.
- Finish (optional): If desired, apply a wood stain or paint to the slice to enhance its natural beauty or add a touch of color. Once dry, apply a clear sealant to protect the wood and enhance its longevity.
- Create a decorative handle (optional): If you prefer, you can add a small metal ring or decorative wire to the top of the wooden slice to create a handle. This allows for easy moving and placement.
- Place the candle: Insert your tea light or votive candle into the drilled hole and enjoy the soft glow of the candle.
This elegant candle holder can be displayed on a coffee table, mantel, or even hung on a wall. It complements any rustic or farmhouse decor beautifully.
Modern Rustic: The Pallet Wood Candle Holder
This contemporary design uses repurposed pallet wood to create a unique and eco-friendly candle holder.
Materials Needed:
- Pallet wood planks
- Saw
- Sandpaper (medium and fine grit)
- Wood glue
- Clamps
- Wood stain or paint (optional)
- Clear sealant (optional)
- Tea lights or votive candles
Instructions:
- Cut the pallet wood: Cut the pallet wood planks into desired sizes for your candle holder base and sides. For a simple design, you could create a rectangular box shape. Alternatively, use different plank lengths for a more rustic and uneven design.
- Assemble the base: Join the wood planks to create the base of the candle holder. Use wood glue and clamps to ensure a secure bond.
- Construct the sides: Attach the side planks to the base. Ensure the sides are tall enough to accommodate your chosen candle size.
- Finish (optional): Sand all the surfaces of the candle holder smooth. You can choose to leave the wood in its natural state, or apply a wood stain or paint for a different look.
- Seal (optional): Once the finish is dry, apply a clear sealant to protect the wood and enhance its longevity.
- Place the candle: Set your tea light or votive candle inside the candle holder. You can place the holder directly on a surface, or you can add legs or feet for a more stable design.
This contemporary rustic design adds a unique touch to any space, making it perfect for those seeking a modern take on farmhouse decor.
Tips for Success
Here are some tips for making successful DIY wooden candle holders:
- Choose the right wood: Select wood types that are suitable for candle holders, such as hardwoods like oak, maple, or walnut. Softwoods like pine can be more prone to burning.
- Safety first: When drilling holes, make sure to use safety glasses and avoid drilling too close to the edges of the wood to prevent splintering.
- Get creative with designs: Experiment with different shapes, sizes, and finishes to create unique and personalized candle holders.
- Prioritize fire safety: Always place candle holders on a stable, heat-resistant surface and never leave them unattended. Keep flammable materials away from the lit candle.
Making your own wooden candle holders is a fun and rewarding project that allows you to express your creativity while adding a touch of rustic charm to your home. The projects described above offer various design options, each with its own unique appeal. By following these instructions, you can craft stunning candle holders that complement your rustic or farmhouse decor perfectly.


No comments:
Post a Comment
Note: Only a member of this blog may post a comment.